

")

Headcut Gully Stuffing is the strategic packing of organic biomass from vegetation management into gullies to stop headcuts from migrating upstream and reduce gullies from incising deeper.
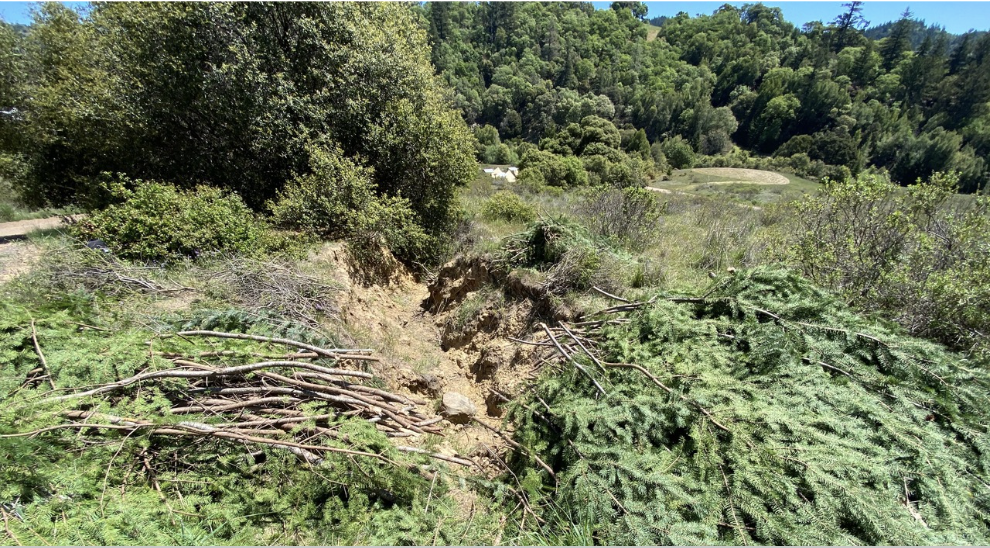
This Practice is similar to “brush plugs” or “brush check dams.” A gully is a steep-sided channel formed by the erosive force of concentrated water. The active point of erosion in a gully is referred to as the “headcut” or “knickpoint.” Headcuts are a sharp change in channel slope. They create a scouring waterfall that erodes the bed and banks of the channel. Without treatment, headcuts “migrate” or move uphill as the gully deepens and widens.

A beneficial biomass headcut control structure installed to reduced further erosion while also retaining and improving a seasonal pool to support a known population of breeding rough-skinned newts (Taricha granulosa). Photo: Brock Dolman/OAEC.
Benefits
This practice can solve a primary issue of vegetation management and fuel load reduction work: what to do with the leftover biomass? Reutilizing material nearby, onsite, can save time, energy and money, and also deliver these benefits for your watershed and upland forest, including:
- Potential improved water quality. Sediment is one of the primary pollutants in our watersheds. Decreasing the erosive power of water concentrated in a gully and trapping sediment in the dense matrix of biomass can reduce sediment delivery downstream to the benefit of healthy salmonids and aquatic life.
- Potential increased water quantity. Eroding gullies can lower the shallow groundwater level. Stopping or slowing the downcutting of gullies can increase water storage in the soil and the flow of water later in the dry season. Slowing, spreading, and sinking water increases the water-holding capacity of the surrounding land, it’s “spongefication!”
- Stop or slow headcut migration, which saves soil and can keep roads and trails passable.
- Enhance and create wildlife habitat. A multitude of species benefit from the cool, moist interior of a stuffed gully, such as Ensatina, arboreal, black, and California slender salamanders.
- Store carbon and reduce emissions. Stuffed gullies store carbon long-term, in the form of water-holding compost that provides a moist, nutrient-rich root bed for the trees that remain after a thinning project. Storing carbon onsite avoids greenhouse gas emissions compared to hauling material away or mobilizing it as a greenhouse gas via wildfire or burning.
When And Where to Stuff a Headcut Gully
This practice is meant to be applied to upland ephemeral or seasonal gullies (classified as Order I, known as Class III in the California Forest Practices Rules), meaning they do not support aquatic life and only flow during or shortly after rain events.
Appropriate sites for the Practice are gullies or headcuts that are actively eroding, delivering sediment, dewatering the adjacent hillslopes, and affecting wildlife and aquatic resources. While erosion is a natural process, the conditions that have created the vast majority of active gullies stem from the increase in runoff from upland land uses, even from the distant past, such as road building, logging, overgrazing, industrial agriculture and urbanization, or residential development.
Ideally, the gully or gullies are next to an overstocked forest or shrubland that needs to be thinned or limbed, so that the resulting biomass can be efficiently utilized as your primary stuffing material.

Key Points Before Proceeding
- It is critical that you read the drainage network and understand the historic and existing hydrologic conditions of your project. Also, carefully observe the plants, animals, and other living features within your project site before beginning work.
- An understanding of the energy, scale, and force of the water entering your project site are essential to designing a successfully-scaled project that avoids the unintended consequence of making soil erosion worse, not better.
- This practice is being used increasingly broadly but has not been peer reviewed.
Permitting
This practice currently requires consultation with state agencies, such as your Regional Water Quality Control Board and the California Department of Fish and Wildlife. Ask these agency representatives to determine if any federal agencies need to be consulted. A good rule of thumb is to get in touch with regulators early, as it may take some time to get your permits processed before you can begin your project.
How to Stuff a Headcut Gully

In areas with lower and wider slopes gully stuffing practices can be further combined with perpendicular bio-log dams to help slow, spread and sink higher flows across the historic flood terrace. Photo: Brock Dolman/OAEC.
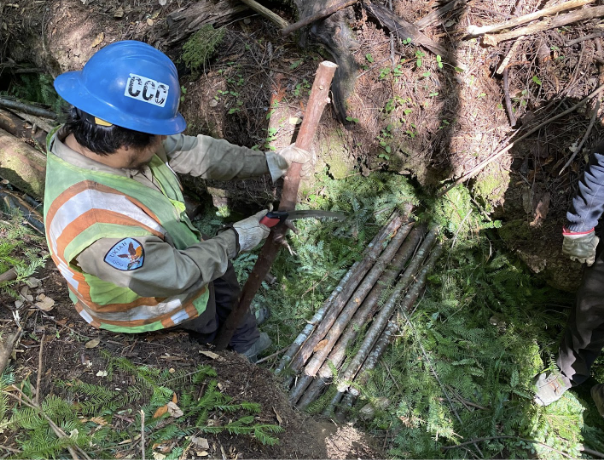
- Source and process your material. This practice is best paired with other vegetation management practices such as Thinning that generate significant biomass material. As you work, process and sort your material into piles of similar sizes and material, such as: less uniform hardwood branches and limbs of hardwood species like California bay and tanoak, larger trunks and woody material, and green, flexible coniferous boughs like Douglas fir or Coastal Redwood. Pile your material with the tips all facing the same direction.
- Drag or carry material to project location and stage it. The green conifer boughs will be used first, so stage these bundles closest to the gully, with the cut ends facing the gully. Depending on the scale of your project, it may be helpful to have a few people working down inside the gully, with others stationed outside, processing and feeding them material.
A deeply incised headcut with freshly limbed conifer “green gauze” boughs properly staged with cut ends facing gully and ready to be laid down tips upstream as the primary base layer. Photo: Brock Dolman/OAEC. - Prepare your gully. Clear out any debris, such as leaf litter and fallen branches, as you will want a “clean” seal between the first layer of gully stuffing material and the base of your headcut gully. Save this material to be reincorporated later.
-
Perpendicular “wood weirs’ being placed on top of a “green gauze” layer in incised channel to help detain more water within the matrix of the finished structure. Photo: Brock Dolman/OAEC. Apply the first base layer of green material. Starting at the headcut or the top of the gully, begin placing the first layer of green material or “green gauze.” The cut ends should be facing downhill with the tips upstream (the opposite of laying roof shingles as you are trying to slow the flow). The goal of this first layer is to cover the entire bed of the gully or anywhere there is exposed channel bed with a solid 4-6 inch layer of “green gauze.” Be attentive to adhering or plastering material against all the edges and sealing up little gaps, holes, hanging roots, and pockets so water doesn’t escape beneath or around your structure and continue to scour out the gully. This layer is the most important to the long-term success of your project.
- Install perpendicular wood “weirs,” or small barriers built across the water flow. At this step, you may choose to install a series of larger limbs or trunks on top of the green layer, across the width of the channel to create a barrier that slows the flow of water through the bottom of the gully. These perform a similar function to what are known as “trench plugs” in utility trenches.
- Fill up the gully with larger, woodier and less uniform material. Begin mixing in other material on top of your “green gauze” layer and the wood “weirs,” to fill up the gully. This step can go faster with less attention to the direction of your material. Compress and compact as you go (chopping with loppers may be helpful), stepping and stomping on the material. At this stage, you can lay in almost any size or type of material: branches, leaves, smaller poles, wood chips, etc. with the goal to create a densely-packed matrix. Be sure to mix in larger logs as they provide more durable, longer-lasting structure. You will be surprised how much biomass can be stuffed into a gully!

Variations on this Practice
- Staking. If your gully has a higher stream power (steeper slope, more flow), you may need to pound in wooden stakes to pin the structure at strategic points as extra reinforcement to prevent it from loosening or moving. Stakes can be made easily with wood from your on-site project (redwood limbs, for example, are durable and rot-resistant). If you are unsure, it is best to add stakes to your project.
- Installing channel-spanning perpendicular structures. Where the gully has a flatter slope, greater width or possible floodplains, you have a good opportunity to install a structure or a series of structures that run perpendicular to the gully in a half-moon shape to further slow the flow and improve infiltration of water into a larger area of soil.
- Retaining wildlife habitat pools. If you identify natural pools along your gully where water remains into the dry season, you may choose to maintain them rather than filling them in, to encourage a water source for wildlife drinking or newt-breeding pools.
Timing Considerations
- This practice requires a permit, which is a major timing consideration.
- Ensure you are working outside of nesting bird season before undertaking vegetation management. Bird nesting is generally from March through August in Sonoma County. This timeframe covers the majority of songbirds and raptors (birds of prey); however, the Northern Spotted Owl can begin nesting as early as January in Sonoma County. It is important to conduct a Nesting Bird Survey if working during nesting bird season.
- Gully stuffing is best done in coordination with, or shortly after, you generate the stuffing material, typically late summer or early fall, to ensure the material is green and flexible and hasn’t lost all its needles. There is great benefit if the finer leaves and needles haven’t broken down and maintain their filtration capacity when the first flows arrive in late fall or early winter.
- For best results, install your structures before the “first flush” or first significant rain of the season, as the first rain is disproportionately rich in fine sediment and organic matter that will serve as an organic sealant and initiate the process of breaking down.
Personal Protective Equipment (PPE)
- Long pants, long sleeve shirt, boots, gloves
- Ear and eye protection (depending on equipment used)
- Chaps if using chainsaw
Tools
- Hand saws, pruners, loppers and/or chainsaws for breaking down and processing material
- Shovels may come in handy to clean out the gully
- A 3-pound mallet if pounding in stakes
Maintenance
During and after flow events, visit your project to verify that the material you installed is functioning properly. If water is scouring out around or beneath the material, or if significant pieces of wood or volumes of soil are moving, then maintenance is needed. Observe how water is moving through the stuffed gully and adaptively repair or rebuild as needed.
Over time, the material in the gully will break down like a compost pile and settle. You may need to return the following year(s) to add more material to bring up the elevation of the stuffed gully and add fresh green material to key areas (especially around the headcut) to continue serving as a biofilter buffer. The maintenance intervals will depend on the specifics of your project, but generally, within a matter of years, the organic matter becomes a stable root-bed that requires little to no maintenance.
Related Practices
Retaining and Creating Habitat Features
Please note: this is a general guide. The specifics of how and when to do this practice will depend on many factors, including the site’s particular vegetation, climate and topography, history, and land management goals. Always consult with a professional if you’re unsure.
Do you have your principles in mind? Remember to regularly check in with your land management goals, to assure your practices and actions will actually achieve your goals.
Additional Resources
- Occidental Arts & Ecology Center’s Blog Post Forest Thinning and Gully Repair
- Marin RCD, Groundwork: A Handbook for Small-Scale Erosion Control in Coastal California.
- Sanctuary Forest, Water Stewardship Guide.