DO THE WORK
Making and Using Biochar
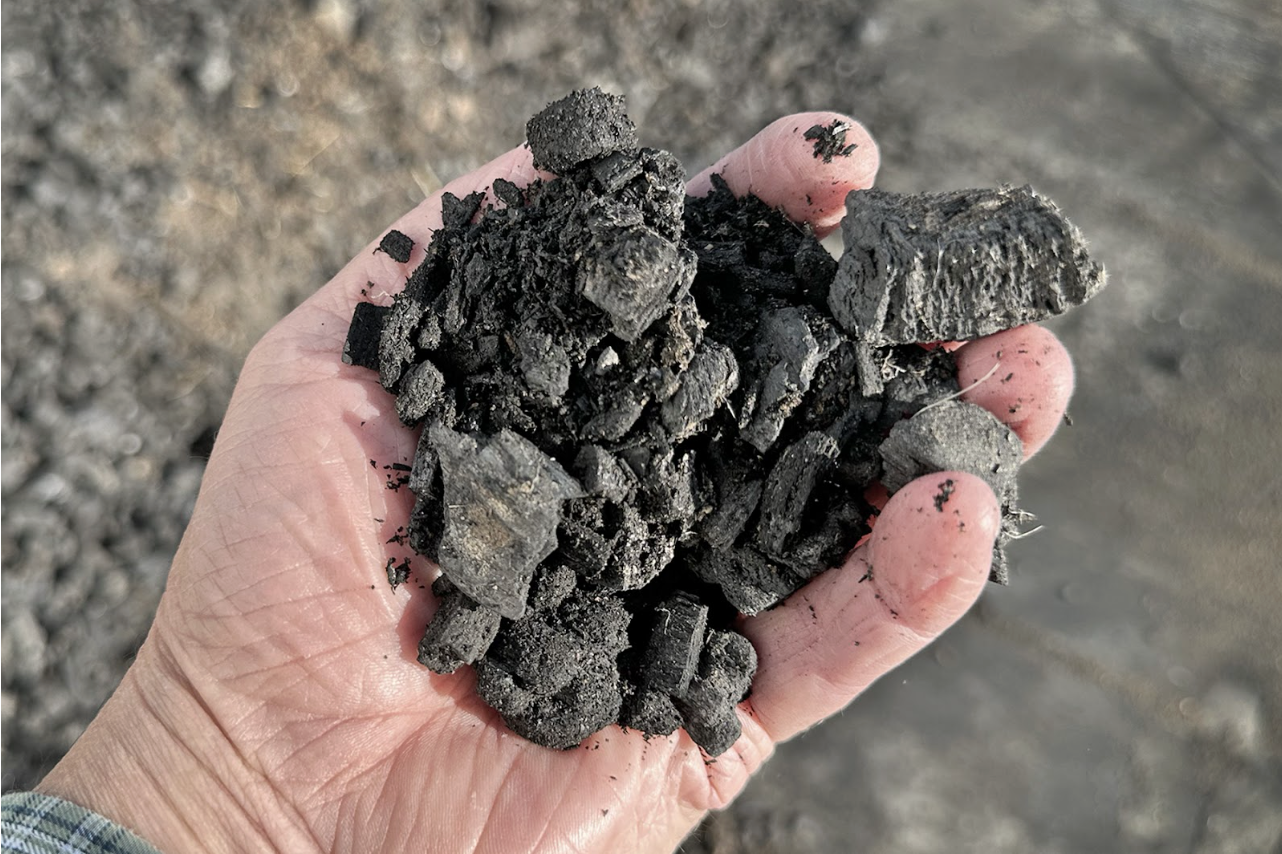
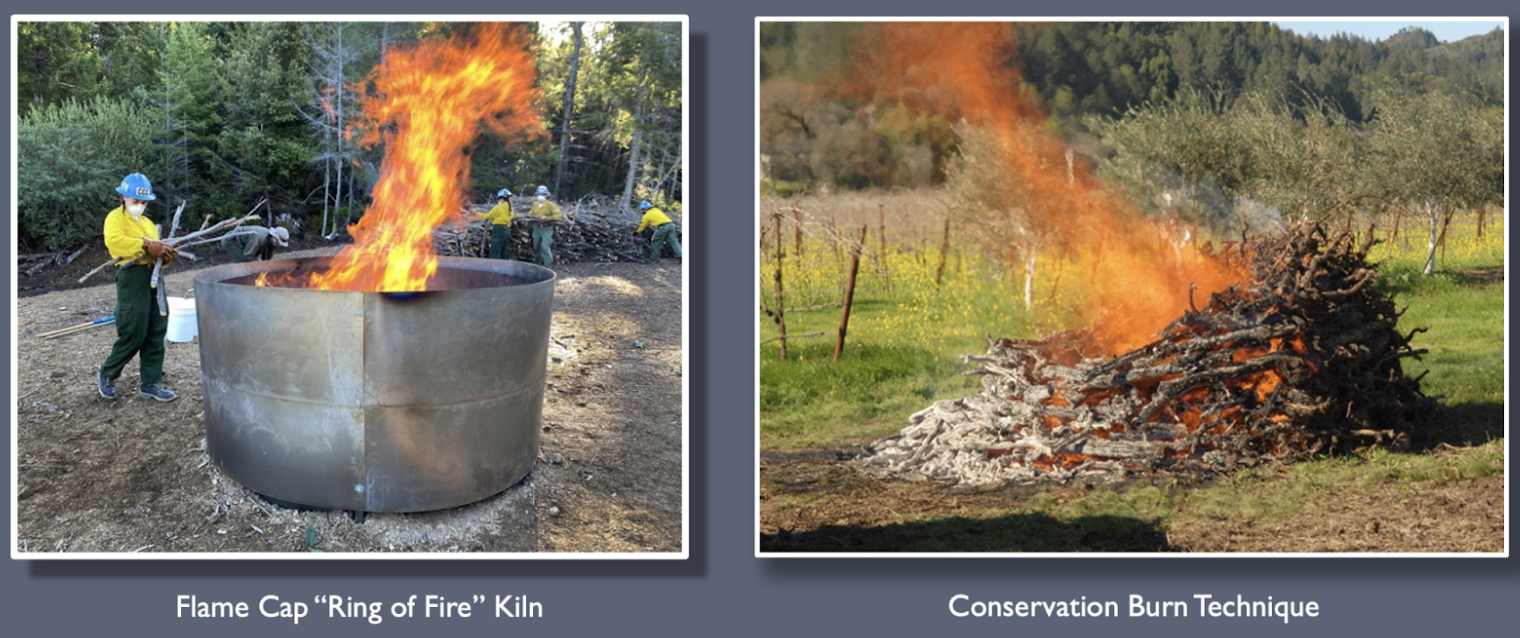
Biochar is a form of charcoal that can provide long-term carbon storage in the soil. Biochar improves soil health by both increasing water and nutrient retention and reducing compaction. It can be made from woody materials using a range of methods. Two techniques that are feasible for moderate amounts of wood are conservation burns and flame-cap kiln burns (described below).


Photo: Raymond Baltar, Sonoma Ecology Center.
Benefits
As with other methods for Managing Woody Material that reduce the volume of flammable material on site, making biochar can decrease wildfire risk after Thinning or Limbing Up Trees, and can help prepare a site for broadcast burning. Unlike any other method, biochar captures and stores carbon for potentially thousands of years. Converting and removing dead material can also create more space, light, and air circulation which promotes the growth of retained large trees, shrubs, and plants.

Photos: Raymond Baltar, Sonoma Ecology Center.
This practice introduces two techniques to create biochar – conservation burn piles and flame-cap kiln burns–both of which can significantly reduce smoke pollution compared with standard open burns. In addition to reducing particulate matter released through burning, these practices create biochar, which, when returned to the soil, sequesters carbon long-term instead of emitting it into the atmosphere.

Photo: Melania Mahoney.
When and Where to Make Biochar
Making biochar instead of standard pile burning is usually a choice made based on the desire to sequester and store carbon onsite instead of putting it all into the atmosphere. Learn more about choosing biochar versus other methods.
A biochar burn site should be:
- On roads, driveways, landings, or other firm, open, level spaces
- Where you can bring at least 100-150 gallons of water
- In a good location for a burn scar; that is, not on top of high-value vegetation such as native perennial grasses, close-packed forest overstory, or rare plants. See below for more details.
- Away from low-hanging tree branches
- In a location with plenty of dry, mid to small material, mostly under 10 inches in diameter unless you want to split larger material
For flame-cap kiln burns, the site also needs to be accessible by a vehicle without causing damage to soils or vegetation.
Key Points Before Proceeding
The conservation burn is a simple adaptation of how burn piles are constructed, lighted, and managed. One training session by an experienced friend or professional is usually all that is needed to learn this technique.
The flame-cap kiln method requires purchase or rental of a kiln, but only requires one or two days of training by an experienced professional to teach the proper assembly and safe operation of the device.
Conservation burns and the flame-cap kiln burns should always be done during the regulated burn season, which typically runs between November 1 to May 1. These dates can change. Always check for details at CAL FIRE’s Burn Permit page as well as your local air quality district. Notifying your local fire agency and in some cases, CAL FIRE is also required. (For more on permits, agencies to contact, and safety tips, visit this Burn Pile Guide.)
Access to water is required to quench the charred material and to prevent charcoal from turning to ash.
Pile burning and flame-cap kiln burns leave burn scars – black patches of soil where seeds and root systems have been killed. Therefore, avoid burns on the forest floor or in open meadows where they can cause damage to soil in these sensitive areas. Burn scars in a meadow or forest floor can take years to regenerate and typically require some follow-up stewardship, such as planting of native grasses to prevent the spread of invasive species or removal of non-native species. However, moving woody material can be challenging, so if avoiding these areas is not possible, avoid placing burn piles on native bunch grasses or groundcover, opting instead for placement on invasive species such as broom.
Kiln or conservation burns should never be done if the weather is above 80 degrees Fahrenheit, relative humidity is below 30 percent, winds are above 10 miles per hour, or if it is raining.
How to Make and Use Biochar
Conservation Burn

Photo: Sonoma Ecology Center.
For successful conservation burn piles that maximize biochar production while minimizing smoke, follow these steps:
- Burn materials that are well seasoned with less than 20 percent moisture content. Inexpensive, pinless moisture meters can be purchased online for $25. It is not recommended to burn on rainy days or to use material that has not been covered during extended rainy periods. Piles can be covered by using biodegradable wax paper or heavy duty, reusable waterproof coverings.
- Use a limited size range of material in each pile to get the most efficient biochar production. Mixing small and large materials in one pile will turn the smaller pieces to ash by the time the larger pieces are fully converted to biochar. For example, divide materials ranging from one inch to four inches in one pile, and materials ranging from five inches to 10 inches (branches and small logs) in a separate pile. If it’s possible to split larger logs, they will burn more quickly. The goal is to complete each burn in one session so that most of the material will cook to coals that you can extinguish in one 6- or 7-hour burn. Do not leave your pile to burn overnight as most will burn to ash.
- The ideal pile sizes: four feet tall by four feet wide by four feet long to eight feet tall by 10 feet wide by 10 feet long. Avoid mixing dirt into the piles; most often, dirt will be on large roots. Piles that are larger than four feet tall by four feet wide by four feet long may require an additional permit from CAL FIRE; always consult with CAL FIRE or local fire agency for larger piles.
- Create a large “bird’s nest” of small, very dry branches or kindling at the top of the pile.
- Light the top of the pile. As an accelerant, a small amount of propane applied from a weed burner torch works well. If the material is dry enough, some wadded newspaper and a match can work just as well.
- If it is at all windy, carefully light the pile from the top on the downwind side.
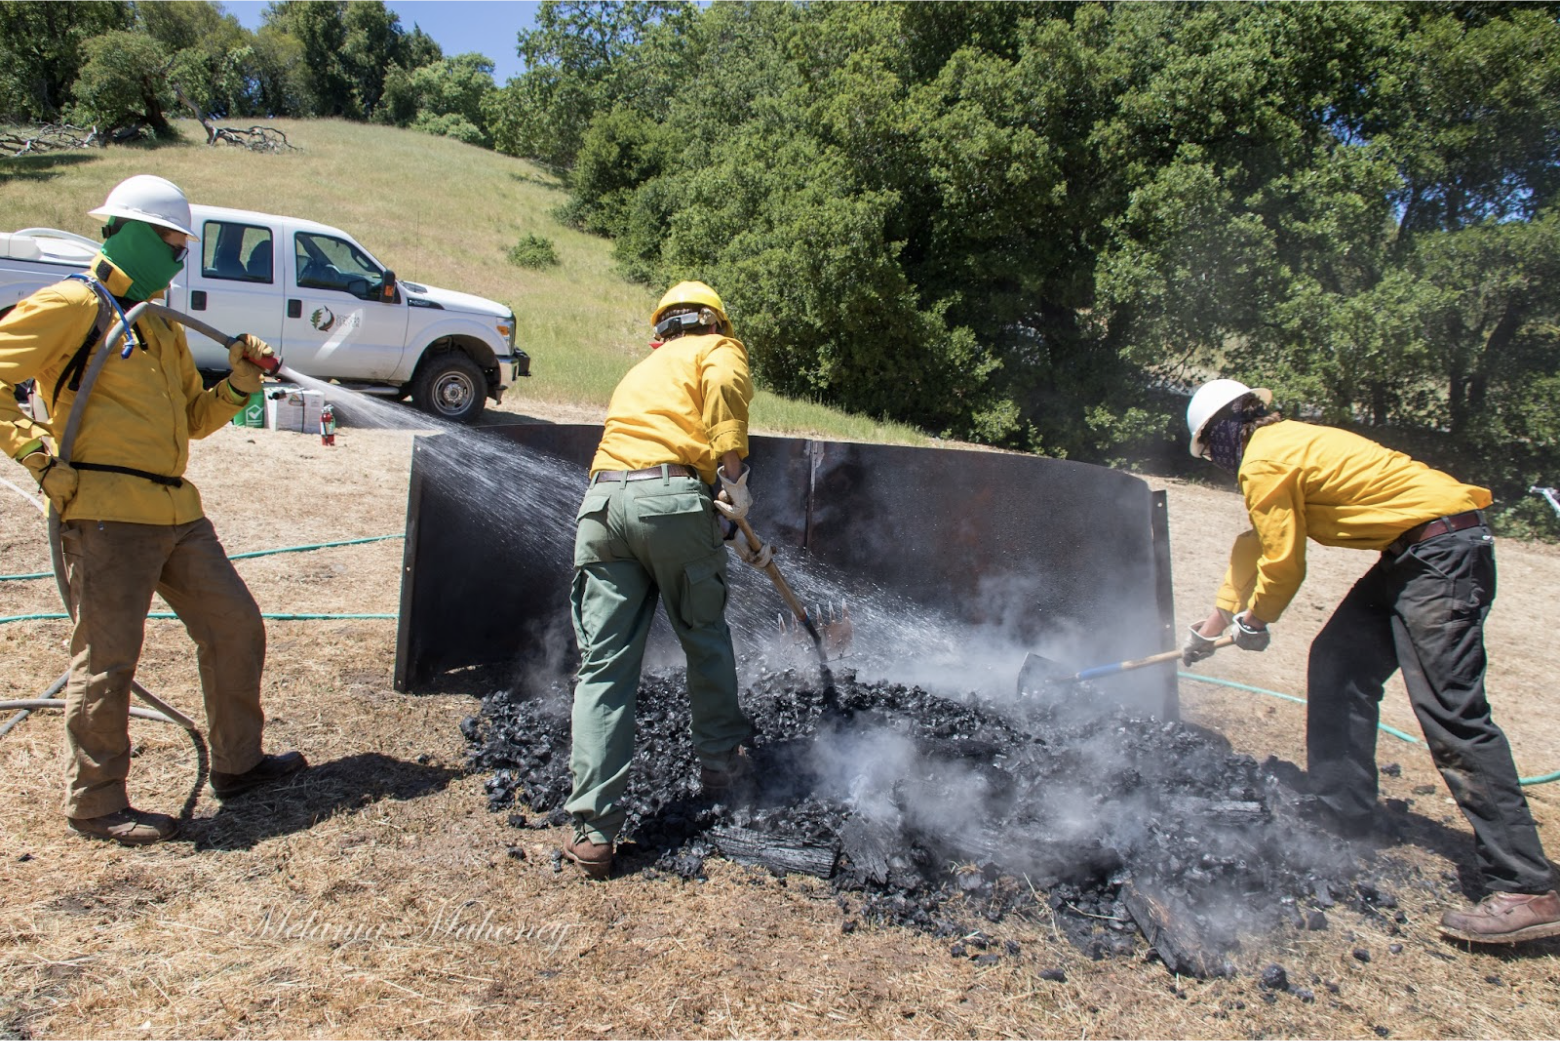
- Once lit, do not add additional material. Let the pile burn down until it is covered in ash and there is no flame present. Quench the pile with water while someone else rakes out the charcoal until the fire is completely extinguished. This is critical to prevent unintended fires and preserve the material as biochar. Quenching a large pile can take up to 100 to 150 gallons of water depending on the pile size but is often less.
- Make sure the fire is completely extinguished. Check at night when the burning coals are easier to detect and for at least 10 days after the burn if it’s not raining or if the winds are above 10 mph to be sure the pile is fully out. The bottom of the pile should be completely cold to the touch of an ungloved hand. (See Section 5 in this Burn Pile Guide for tips on how to fully extinguish ash and coal piles).
Flame-cap Kiln Burn

Photos: Raymond Baltar, Sonoma Ecology Center.
- While there are many types of flame-cap kilns, Wilson Biochar produces a portable version called the “Ring of Fire Biochar Kiln” that is easy to set up and break down, convenient to transport as flat panels that fit into a pickup truck, and is highly efficient at producing good quality biochar while significantly reducing smoke.
- Assemble the kiln on a flat surface. Pack soil against the inner panel on the outside of the kiln to prevent air from entering at the base.
- Make sure the materials used are well seasoned with less than 20 percent moisture content. Inexpensive, pinless moisture meters can be purchased online for $25. It is not recommended to burn on rainy days or to use material that has not been covered during extended rainy periods.
- Use only material that is four inches or less in diameter and cut to four feet or less in length.
- Fill the kiln with material, starting with small sticks at the bottom, medium-sized logs and branches in the middle, and small material in the upper section, creating a large “bird’s nest” of very dry branches or kindling at the top of the pile.
- Light the pile using a small amount of propane sprayed as an accelerant from a weed burner torch. If the material is dry enough, wadded newspaper and a match can work just as well.
- As the pile burns down, keep adding smaller material until the fire has really taken off. Then start adding in a mix of smaller and large-sized pieces, making sure to keep a good flame at the top. Adding too much too fast will smother the flame and cause the fire to produce smoke, so only add enough to keep the flame constant.This flame consumes most of the smoke that is produced and keeps oxygen from entering the lower part of the kiln, preventing the coals from burning to ash.
- Once the kiln is ¾ to ⅘ full of charred material, use a strong stream of pumped water to start quenching the pile as workers carefully open the kiln and start raking out the biochar until the fire is completely extinguished. This is critical to prevent unintentional fires and preserve the material as biochar. Quenching normally takes up to 100 or 150 gallons of water.
Make sure the fire is completely extinguished. Check at night when the burning coals are easier to detect and for at least 10 days after the burn if it’s not raining or if the winds are above 10 mph to be sure the pile is fully out. The bottom of the pile should be completely cold to the touch of an ungloved hand. (See Section 5 in this Burn Pile Guide for tips on how to fully extinguish ash and coal piles).

Photo: Sonoma Ecology Center.
What to do with the biochar
After the biochar has been completely quenched, it can be gathered and spread back into the forest, amended into the soil, especially in burn scars, or bagged and prepared for use in gardens or landscaping at a ratio of 5-50% biochar to 50-95% compost. The biochar should be crushed before use where possible. This can be done using a maul, running over the material with a truck or excavator, or by any other method that breaks down the material to smaller sizes.
Timing Considerations
Most burning activities are done during burn season, usually November to May, after the first rains have decreased fire danger. As long as the harvested materials have been allowed to season over a summer, it is best to conduct the burns as early in the burn season as possible. If you build piles in advance, either cover them or avoid burning in the spring to protect nesting birds or other animals that have taken up residence in the piles.
This practice is best done outside of the bird nesting season, generally from March through August in Sonoma County. This timeframe covers nesting season for the majority of songbirds and raptors (birds of prey). If the work is done during nesting season, consider first conducting Nesting Bird Surveys. Surveying over a longer period can protect more types of birds. For example, the Northern Spotted Owl can begin nesting as early as January in Sonoma County.
Equipment
Personal Protective Equipment (PPE)
- Long pants and a long sleeve shirt made of Nomex or non-synthetic/natural materials such as cotton or wool which are naturally fire resistant. Tip: Wear clothes you don’t mind getting burn holes in.
- “Vibram” soled, waterproof boots
- Helmet
- Eye protection
- Leather gloves (it’s nice to have a pair of welders gloves as well for moving partially burned logs)
- Ear protection
Tools
- McLeods
- Metal rakes
- Battery powered leaf blower to fan fire
- Hand saw, pruner and/or loppers
- Battery powered chain saws to trim material to size
- Crescent wrenches and pliers for assembling/disassembling kilns
Maintenance
To reduce rusting, kilns should be cleaned of dirt and ash after use and stored under cover.
Related Practices
Retaining & Creating Habitat Features
Managing Roads and Trails (coming soon)
Please note: this is a general guide. The specifics of how and when to do this practice will depend on many factors, including the site’s particular vegetation, climate and topography, history, and land management goals. Always consult with a professional if you’re unsure.
Do you have your principles in mind? Remember to regularly check in with your land management goals, to assure your practices and actions will actually achieve them.
Additional Resources
The Biochar Handbook – for users is a comprehensive guide to everything Biochar
Biochar in the Southwest is a great guidebook on how to produce biochar and use biochar as an alternative to standard open burning.
Wilson Biochar, designer of the “Ring of Fire Biochar Kiln.” A great resource for all things biochar.
U.S. Biochar Initiative is a nonprofit that provides helpful resources on biochar topics.
An accessible article explaining biochar and its benefits for carbon drawdown.
Sonoma Biochar Initiative: a project of Sonoma Ecology Center offers trainings in the use of biochar. Sign up for the newsletter to get class announcements.
A recent study that looks at the benefits of biochar, including its potential to promote the productivity and water retention of soil, and reduce greenhouse gas emissions.


